Monday, 19 November 2018

Collections in PowerApps

Today, I will be discussing about the collections and how to use/manage them in powerapps. Let's begin with a scenario where we want to add list of items in a store and can perform addition or deletion on them. For storing data we require a data source/ table but here we will be using collection for this purpose.

Collection : It is used to store data that can be used in your app or we can define it as a set or group of similar items.

-Login to PowerApps.

-Create a canvas app from blank.


- Add a screen and select on Start function which will be used for creating collection.

Syntax : Collect (CollectionName, Items)

This method takes two parameters : Collection name and items which are required to be added in collection table.

Add following formula into it.
Collect(ItemsDemoList, {Items:ItemId.Text, ItemNames:ItemName.Text,ItemQuantity:Quantity.Text, ItemPrice:Price.Text})

It will create a table with columns : ItemId, ItemName, Quantity and Price.
Now for viewing data we will add a gallery control on a screen and will set its datasource to ItemsDemoList. I have mapped Title1 and subTitle fields with ItemId and ItemNames.


Add a collection
Now for adding a collection : I have created a screen which will have following fields
ItemId, ItemName , Quantity and Price.
On its header I have added a icon and set below mentioned expression on that icon.

Collect(ItemsDemoList, {Items:ItemId.Text, ItemsName:ItemName.Text,ItemQuantity:Quantity.Text, ItemPrice:Price.Text})

Remove collection

For removing element from collection. I have added a delete icon on browser screen and added following expression on it which will be used for deleting selected value from collection.

Remove(ItemsDemoList, ThisItem)


This item will be giving  selected item which we are going to delete from the collection.

Clear collection

For instance if we want to delete or clear whole collection then we need to use this expression.

Clear (CollectionName)

Example :Clear(ItemsDemoList)

Final output will be :

Note: At first your app will be showing no data because our collection is empty.

Add items screen


Browse screen


You can also verify your data within collection by going on this navigation : View -> Collections -> ItemDemoList collection


Removed item from collection by clicking on delete icon in browser screen. In my case one item has been deleted now the browse screen will be showing remaining items.


Friday, 9 November 2018

Import and export MS Flow - Part 2

This part is the continuation of MS flow import and export functionality blog. So, today I will be discussing about how to import MS flow on your environment.

Following steps are required for importing MS flow.

Step 1) Login to MS Flow portal.

Step 2)Select your environment by clicking on your account and it will show list of environments.


Step 3)  Click on My Flows menu and select Import option.

Step 4) Upload your file from desired path.


Step 5)  Details of package will be available and you will see resource type gmail will be in red sign. that's why import button is disabled. Click on configure button for adding resource type gmail.


Step 6) Click on create new button and it will navigate you to Connections in new tab.
Note  : We don't have any resource type right now for gmail that's why we are creating new one. If you have any resource type available you may utilize it.


Step 7) Create a new connection and search for gmail. Click on gmail connection and sign in to your gmail account.


Step 8) Newly created connection will be added in your list now. Go back to import setup screen and refresh list. Select your gmail id and save button will be enabled now. Save your settings.


Step 9) Now you will see your Import button is enabled. Click on it and your flow will be imported.


After importing flow successfully, you will be available to check it in your my flow list.


Note : I need to add gmail resource type here but in your case its all depends upon your flow design what type of resource you will need or may be you won't require any resource type.

Import and export MS Flow - Part 1

Today, I will be discussing about how to import and export MS flow. Importing and exporting is one of the common operations which are required for any functionality whenever we want to moving or use it in another environment. Here in this part I will discussing about the exporting process of MS flow.

Following steps are required for exporting  MS flows.

Step 1) Login to MS Flow portal.

Step 2) Click on My Flows menu. It will show list of flows you have already created.


Step 3) Click on your flow and right click on three vertical dots and select export option. It will show two options :

  • Packages (.zip)
  • Logic App template (.json)
Here I will select Packages (.zip) option.


Step 4) Enter package details and you need to review package content. Here for resource type Flow click on setting button and select create as new option. As we all know that our flow will be imported in new environment so whenever we will import it in another environment then it should be created automatically there.


Step 5) Rest of related resources type will be authenticated and added whenever your flow will be imported in another environment. Just like here gmail id will be requested from user at a time of importing flow in another environment. After verifying settings now click on export option.


Step 6) Your zip file will be downloaded and saved on your defined location/path.


Thursday, 8 November 2018

Payment journal workflow approval in AX and Enterprise portal - Using work list from role centre

Today, I will be discussing about how to enable workflow approval on payment journals in AX and enterprise portal . Let's say we have a requirement where our client want to submit payment journal from AX but at a time same time he wants to perform its approval  from AX and  enterprise portal by using role center. As we all know that in standard AX there is no workflow enabled for payment journals in Account payable module. However, MS have provided us few artifacts for Vendor disbursement journal workflow which are mentioned below.
  • Workflow  category : LedgerJournalWFApprovalVendor
  • Workflow type :  VendDisbursementTemplate
  • Workflow approval : VendDisbursementApproval
  • Menu items 
    • Document Menu Item : LedgerJournalTable5
    • Resubmit Menu Item   : PaymVendDisbWFApprResubmitToWF
    • Delegate Menu Item     : PaymVendDisbWFApprDelegate
    • SubmitToWorkflow MenuItem : PaymVendDisbWFApprSubmitToWF
    • Cancel MenuItem : PaymVendDisbWFApprCancel
  • Classes
    • LedgerJournalWFApprEventHandlerWF
    • LedgerJournalWFApprEventHandlerElem


As we all can see that  each menu item has been attached in workflow type for client only and no web menu item has been introduced for Enterprise portal. So, we need to perform some customization for enabling workflow on payment journal on both sides (AX client and  enterprise portal).
Moving a head you must have noted that there is no ledger journal table form available in Enterprise portal. Standard LedgerJournalTable form is not associated with any template so its deployment to EP is not possible. Since our requirement is very limited so we are not going to create a similar  ledger journal table form in Enterprise portal instead of  this we will create a simple form with list page template by showing limited number of fields in it. This is simple work around  for achieving our target.

Following elements are required to be created.

  • Web Menu Item (Actions)
    • Web menu item for approval action
    • Web menu item for reject action
    • Web menu item for delegate action
  • Create a form with list page  template which will show all vendor payment journals and  deploy it to EP so that its web URL menu item will be created automatically.
Step 1) Create a simple query and add LedgerJournalTable as a data source. Add a range for journal type field with value Vendor Disbursement. 


Step 2) Create a form with list page template and add a query into it. Enable workflow on it by using its design properties.


Step 3) Create a display menu and attach your form with it.


Step 4) Deploy newly create menu item to EP and it will automatically create a web URL menu item. For this purpose right click on display menu item and select deploy to EP option.


Step 5) Create following web menu items for approval, delegation and rejection.


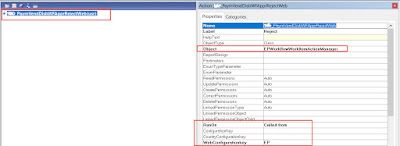
Step 6) Attach web menu items with workflow type and work flow approval.


Step 7) Enable workflow on Ledger Journal Table form. For this purpose go to Design Properties of LedgerJournalTable form  and set following properties on it.


Step 8) Compile and run Full CIL in order to check impacts.

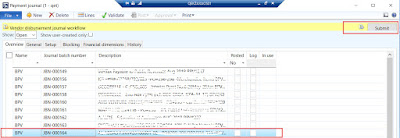
Final output :


After submitting approval for selected item. Your workflow will be removed from work list and its payment journal will be approved.

Don't forget to configure vendor disbursement workflow in account payable workflows and activate it.


Custom Business events Part 3 - (Activate custom business event) in D365 F&O

 In this blog we will discuss about the steps to activate a custom business in D365 F&O. As we know that business event catalog does not...