Today, I will be discussing about how to call external class method in enterprise portal.
There was a requirement in which we need to update some information on updating the vendor account within purchase requisition web page on enterprise portal.
For changing this target i created a new class and added a static method inside it. This class was created with in AX and names as PRTestHelper class.
Class: PRTestHelper
Static Method : updateVendorAccount
Now we need to add override the ondatachanged method of vendor account field in PurchReqLineInfo_ascx_cs. Add following code in the class.
protected void VendAccount_DataChanged(object sender, AxBoundFieldDataChangedEventArgs e)
{
this.setupDefaultDimension(true);
if (Page.IsPostBack)
{
Page.Validate();
if (Page.IsValid)
{
DataSetViewRow row;
row = this.PurchReqLineDS.GetDataSet().DataSetViews["PurchReqLine"].GetCurrent();
this.AxSession.AxaptaAdapter.CallStaticClassMethod("PRTestHelper", "updateVendorAccount", row.GetFieldValue("RecId"), row.GetFieldValue("VendAccount"));
DialogHelper.Close(CloseDialogBehavior.RefreshPage);
}
}
}
// Following code is used to call method : this.AxSession.AxaptaAdapter.CallStaticClassMethod("PRTestHelper", "updateVendorAccount", row.GetFieldValue("RecId"), row.GetFieldValue("VendAccount"));
First parameter is : Class name
Second parameter is : Method name
Third parameter is : RecId of Purchase Requisition line
Fourth parameter is : Vendor account
Note : 3rd and 4th parameter are optional as we are using them to send parameter to static method.
Showing posts with label Enterprise portal. Show all posts
Showing posts with label Enterprise portal. Show all posts
Monday, 24 February 2020

How to find web controls in Enterprise portal (EP)
Today , I will be discussing about the approach through which we can find out the web controls of enterprise portal.
Lets take an example of Purchase Requisition web page in Enterprise portal.
1) Go to Enterprise portal -> Purchase Requisition tab -> Click on one of the Purchase requisition
2) Click on Page tab

3) Click on Edit page drop down and select edit page option.

4) Click on drop arrow and select edit web part. The name within managed content item is web control name.

Lets take an example of Purchase Requisition web page in Enterprise portal.
1) Go to Enterprise portal -> Purchase Requisition tab -> Click on one of the Purchase requisition
2) Click on Page tab

3) Click on Edit page drop down and select edit page option.

4) Click on drop arrow and select edit web part. The name within managed content item is web control name.

Thursday, 9 January 2020
Adding a dataset lookup on purchase requisition form in EP
Today, I will be discussing about one of the issue which any one has encountered while adding a lookup on data set and it is not visible in EP specially on Purchase Requisition details form. So I will be sharing here the code snippet which can used to show that data set lookup for any field.
void dataSetLookup(SysDataSetLookup _sysDataSetLookup)
{
Query query;
TableId lookupTableNum;
lookuptablenum = tableNum(PurchReqTable);
_sysDataSetLookup.parmLookupFields(new List(Types::String));
_sysDataSetLookup.parmLookupFields().addEnd(fieldStr(PurchReqTable,PurchReqId));
_sysDataSetLookup.parmLookupFields().addEnd(fieldStr(PurchReqTable,TestField1));
_sysDataSetLookup.parmLookupFields().addEnd(fieldStr(PurchReqTable,PurchReqId));
_sysDataSetLookup.parmLookupFields().addEnd(fieldStr(PurchReqTable,Originator));
_sysDataSetLookup.parmSelectField(fieldStr(PurchReqTable,TestField1));
query = new Query(queryStr (PurchReqTableListPage));
query.dataSourceNo(1).addRange(fieldNum(PurchReqTable,TestField1type)).value(enum2str(RequisitionType::Type1));
query.dataSourceNo(1).addRange(fieldNum(PurchReqTable,RequisitionStatus)).value(enum2str(PurchReqRequisitionStatus::Approved));
query.dataSourceNo(1).addRange(fieldNum(PurchReqTable,BlanketOnHold)).value(enum2str(NoYes::no));
query.allowCrossCompany(true);
_sysDataSetLookup.parmQuery(query);
_sysDataSetLookup.parmDataSet(SysDataSetBuilder::constructLookupDataSet(lookupTableNum).toDataSet());
}
Note : This construct method is quite helpful in showing lookup
void dataSetLookup(SysDataSetLookup _sysDataSetLookup)
{
Query query;
TableId lookupTableNum;
lookuptablenum = tableNum(PurchReqTable);
_sysDataSetLookup.parmLookupFields(new List(Types::String));
_sysDataSetLookup.parmLookupFields().addEnd(fieldStr(PurchReqTable,PurchReqId));
_sysDataSetLookup.parmLookupFields().addEnd(fieldStr(PurchReqTable,TestField1));
_sysDataSetLookup.parmLookupFields().addEnd(fieldStr(PurchReqTable,PurchReqId));
_sysDataSetLookup.parmLookupFields().addEnd(fieldStr(PurchReqTable,Originator));
_sysDataSetLookup.parmSelectField(fieldStr(PurchReqTable,TestField1));
query = new Query(queryStr (PurchReqTableListPage));
query.dataSourceNo(1).addRange(fieldNum(PurchReqTable,TestField1type)).value(enum2str(RequisitionType::Type1));
query.dataSourceNo(1).addRange(fieldNum(PurchReqTable,RequisitionStatus)).value(enum2str(PurchReqRequisitionStatus::Approved));
query.dataSourceNo(1).addRange(fieldNum(PurchReqTable,BlanketOnHold)).value(enum2str(NoYes::no));
query.allowCrossCompany(true);
_sysDataSetLookup.parmQuery(query);
_sysDataSetLookup.parmDataSet(SysDataSetBuilder::constructLookupDataSet(lookupTableNum).toDataSet());
}
Note : This construct method is quite helpful in showing lookup
Thursday, 8 November 2018
Payment journal workflow approval in AX and Enterprise portal - Using work list from role centre
Today, I will be discussing about how to enable workflow approval on payment journals in AX and enterprise portal . Let's say we have a requirement where our client want to submit payment journal from AX but at a time same time he wants to perform its approval from AX and enterprise portal by using role center. As we all know that in standard AX there is no workflow enabled for payment journals in Account payable module. However, MS have provided us few artifacts for Vendor disbursement journal workflow which are mentioned below.


As we all can see that each menu item has been attached in workflow type for client only and no web menu item has been introduced for Enterprise portal. So, we need to perform some customization for enabling workflow on payment journal on both sides (AX client and enterprise portal).
Moving a head you must have noted that there is no ledger journal table form available in Enterprise portal. Standard LedgerJournalTable form is not associated with any template so its deployment to EP is not possible. Since our requirement is very limited so we are not going to create a similar ledger journal table form in Enterprise portal instead of this we will create a simple form with list page template by showing limited number of fields in it. This is simple work around for achieving our target.
Following elements are required to be created.

Step 2) Create a form with list page template and add a query into it. Enable workflow on it by using its design properties.

Step 3) Create a display menu and attach your form with it.

Step 4) Deploy newly create menu item to EP and it will automatically create a web URL menu item. For this purpose right click on display menu item and select deploy to EP option.


Step 5) Create following web menu items for approval, delegation and rejection.


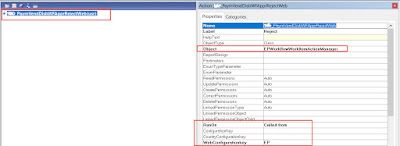
Step 6) Attach web menu items with workflow type and work flow approval.


 Step 7) Enable workflow on Ledger Journal Table form. For this purpose go to Design Properties of LedgerJournalTable form and set following properties on it.

Step 8) Compile and run Full CIL in order to check impacts.
Final output :
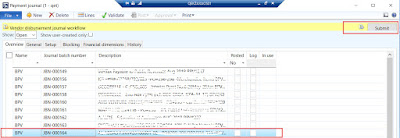

After submitting approval for selected item. Your workflow will be removed from work list and its payment journal will be approved.
Don't forget to configure vendor disbursement workflow in account payable workflows and activate it.
- Workflow category : LedgerJournalWFApprovalVendor
- Workflow type : VendDisbursementTemplate
- Workflow approval : VendDisbursementApproval
- Menu items
- Document Menu Item : LedgerJournalTable5
- Resubmit Menu Item : PaymVendDisbWFApprResubmitToWF
- Delegate Menu Item : PaymVendDisbWFApprDelegate
- SubmitToWorkflow MenuItem : PaymVendDisbWFApprSubmitToWF
- Cancel MenuItem : PaymVendDisbWFApprCancel
- Classes
- LedgerJournalWFApprEventHandlerWF
- LedgerJournalWFApprEventHandlerElem

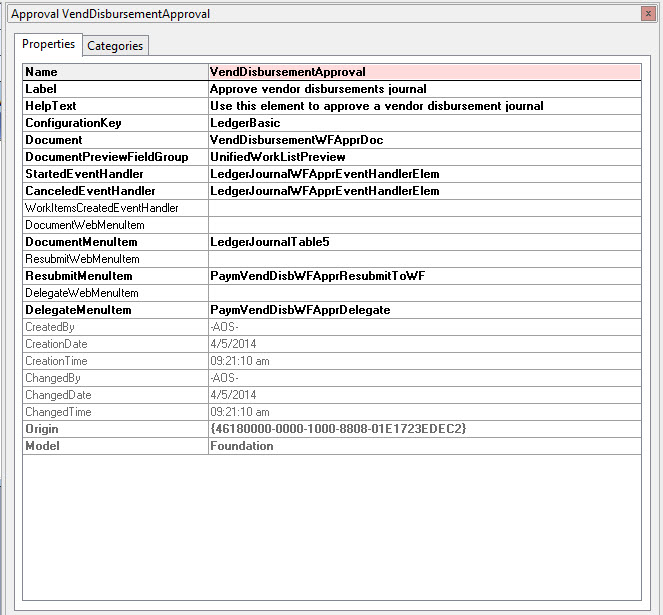
As we all can see that each menu item has been attached in workflow type for client only and no web menu item has been introduced for Enterprise portal. So, we need to perform some customization for enabling workflow on payment journal on both sides (AX client and enterprise portal).
Moving a head you must have noted that there is no ledger journal table form available in Enterprise portal. Standard LedgerJournalTable form is not associated with any template so its deployment to EP is not possible. Since our requirement is very limited so we are not going to create a similar ledger journal table form in Enterprise portal instead of this we will create a simple form with list page template by showing limited number of fields in it. This is simple work around for achieving our target.
Following elements are required to be created.
- Web Menu Item (Actions)
- Web menu item for approval action
- Web menu item for reject action
- Web menu item for delegate action
- Create a form with list page template which will show all vendor payment journals and deploy it to EP so that its web URL menu item will be created automatically.
Step 1) Create a simple query and add LedgerJournalTable as a data source. Add a range for journal type field with value Vendor Disbursement.

Step 2) Create a form with list page template and add a query into it. Enable workflow on it by using its design properties.

Step 3) Create a display menu and attach your form with it.

Step 4) Deploy newly create menu item to EP and it will automatically create a web URL menu item. For this purpose right click on display menu item and select deploy to EP option.


Step 5) Create following web menu items for approval, delegation and rejection.


Step 6) Attach web menu items with workflow type and work flow approval.


Step 8) Compile and run Full CIL in order to check impacts.
Final output :


Don't forget to configure vendor disbursement workflow in account payable workflows and activate it.
Tuesday, 9 October 2018
Workflow submit manager code for client and Enterprise portal (EP) in AX 2012
Today I will be sharing the code of workflow submit manager class for the client and enterprise portal.
You all have noted that whenever a workflow type is created at that time automatically its submit manager class is generated. I have used same class and added two different methods for workflow submit manager in order to segregation for client and EP calling. Then in main method i have called those two methods on basis of menu item condition.
You may create a new class for submit manager or use existing generated and add following code in it.
Note: If you are creating new class for submit manager don't forget to select that class in properties of workflow type.


You all have noted that whenever a workflow type is created at that time automatically its submit manager class is generated. I have used same class and added two different methods for workflow submit manager in order to segregation for client and EP calling. Then in main method i have called those two methods on basis of menu item condition.
You may create a new class for submit manager or use existing generated and add following code in it.
Note: If you are creating new class for submit manager don't forget to select that class in properties of workflow type.


Friday, 5 October 2018
Create custom lookup for a Data set field
Today, I will be discussing about how to create a lookup for a data set field. In enterprise portal the TitleField1 and TitleField2 properties are used as the default content for a lookup. However you can use the datasetLookup() method in the field of data source of data set in order to set the content for lookup.
Step 1) Go to your data set and expand its data source. Now add a method for dataSetLookup().

Step 3) Add code in dataSetLookup() method. In my case i need to show list of all employees which belong to selected department. I am showing here only personnel number of employee.

Step 4) Below is the configured lookup displaying personnel numbers.

Step 1) Go to your data set and expand its data source. Now add a method for dataSetLookup().

Step 3) Add code in dataSetLookup() method. In my case i need to show list of all employees which belong to selected department. I am showing here only personnel number of employee.

Step 4) Below is the configured lookup displaying personnel numbers.

Subscribe to:
Posts (Atom)
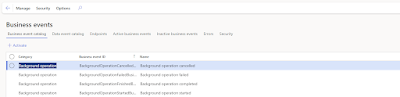
Custom Business events Part 3 - (Activate custom business event) in D365 F&O
In this blog we will discuss about the steps to activate a custom business in D365 F&O. As we know that business event catalog does not...
-
 Today, i will be discussing about one of the common issue of expired certification on development machine. You guys must have observed one o...
 -
 Today, I will share the list of blogs which give the understanding of how to connect azure blob storage with Dynamics 365 for finance and op...
 -
 Today, I will share another part of connecting azure blob storage with Dynamics 365 for finance and operations series. This part will be abo...