Following tasks will be performed in order to complete this process.
- We need to define one or more SQL database in which we can bring exported data into from D365.
- Export process can be performed into two ways
- Full push – All records will be exported
- Incremental push – Only records that have been changed will be pushed
- We will use scheduling capabilities of finance and operations batch framework to enable periodic exports.
- We will access the entity database by using Transact-SQL (T-SQL) and even extend the database by adding more tables.
1. Create a SQL database
I have my own development environment, so I will create a database in the local Microsoft SQL Server database. For production environments, you must create a SQL database.
a) Open Microsoft SQL Server Management and execute below mentioned command for creating new database. I have used “Test_BringYourOwnDB” as database name.

2.You need a user for configuring it in D365. Following step can be applied for creating new user in SQL.
a) Open Microsoft SQL Server Management and select security folder. Expand logins and right click for new user. In general tab give login name and password of your choice. In user mapping tab select your newly created database name and assign roles to it.


3. Configure the entity export option
a) Go to data management work space in finance and operations client then select the configure entity export to database tile.
b) New form will be opened. Add a new record in it by clicking the “New” button. Set unique name and description for your db.
c) Now enter connection string with this format
Data Source=<logical server name>,1433; Initial Catalog=<your DB name>; Integrated Security=False; User ID=<SQL user ID>; Password=<password>
Note: You need to login in to your newly created database using SQL server management studio at least once in order to change its password. Otherwise here connection string won’t be validated. Also remove <> from string format.

d) Select “Validate” button in order to make sure that connection is successful. This message will be prompted.

e) Now publish your selected record. By clicking on publish button.

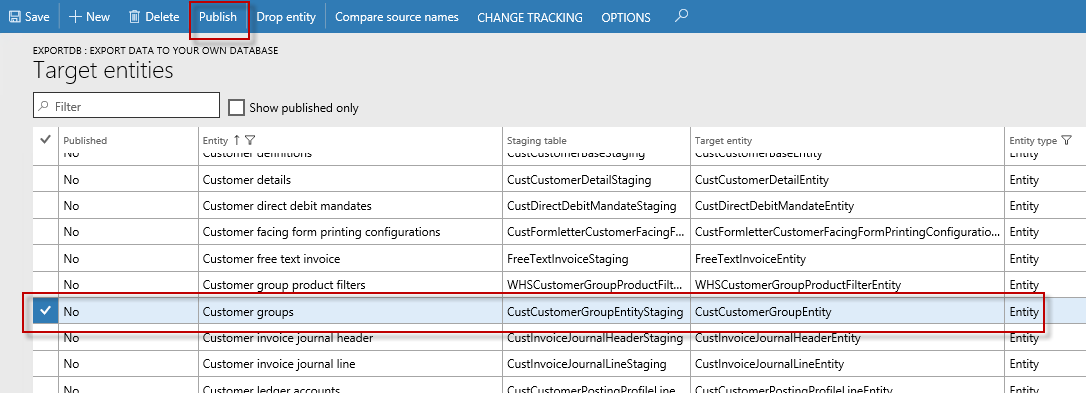
f) Now it will open a publish page with multiple options for you.
g) For demo purpose I am here just select one entity that is customer groups. We will publish it only. A job will be schedule that will publish its schema in newly created database.

h)After successful execution of job below mentioned message will be prompted. Also you may cross check published entities only by marking a show published only checkbox. It will filter data by showing only published entities.


4. Export data to your database
a) Go to data management work space and select export tile into it.
b) Add below details into it and click export button.
Note: I have selected here full push only because I have not enabled change tracking on publish form. So it will not support incremental push.


a) Open Microsoft SQL Server Management and execute below mentioned command for creating new database. I have used “Test_BringYourOwnDB” as database name.

2.You need a user for configuring it in D365. Following step can be applied for creating new user in SQL.
a) Open Microsoft SQL Server Management and select security folder. Expand logins and right click for new user. In general tab give login name and password of your choice. In user mapping tab select your newly created database name and assign roles to it.


3. Configure the entity export option
a) Go to data management work space in finance and operations client then select the configure entity export to database tile.
b) New form will be opened. Add a new record in it by clicking the “New” button. Set unique name and description for your db.
c) Now enter connection string with this format
Data Source=<logical server name>,1433; Initial Catalog=<your DB name>; Integrated Security=False; User ID=<SQL user ID>; Password=<password>
Note: You need to login in to your newly created database using SQL server management studio at least once in order to change its password. Otherwise here connection string won’t be validated. Also remove <> from string format.

d) Select “Validate” button in order to make sure that connection is successful. This message will be prompted.

e) Now publish your selected record. By clicking on publish button.

f) Now it will open a publish page with multiple options for you.
- Publish new entities to the database.
- Delete previously published entities from the database.
- Compare published entities with the entity schema in finance and operations.
- Configure change tracking functionality that enables incremental updates of your data.
g) For demo purpose I am here just select one entity that is customer groups. We will publish it only. A job will be schedule that will publish its schema in newly created database.
h)After successful execution of job below mentioned message will be prompted. Also you may cross check published entities only by marking a show published only checkbox. It will filter data by showing only published entities.


4. Export data to your database
a) Go to data management work space and select export tile into it.
b) Add below details into it and click export button.
Note: I have selected here full push only because I have not enabled change tracking on publish form. So it will not support incremental push.


When execute the export BYOD, how to data commit to BYOU?
ReplyDeleteExport all data one time
OR
Export line by line record to BYOD data?
Thanks and regards,
As we have set to Full push it will export all data one time.
Delete